Android based smartphone are widely used because high quality product is available as reasonable price. Android smartphone having ...
Android based smartphone are widely used
because high quality product is available as reasonable price. Android
smartphone having amazing features which makes our daily life easy. We
can use android for education, business, entertainment and for many
other purposes. Android devices are most popular because we can manually
add features by installing Android apps, even we can enjoy by playing
games on android. I already listed our some best games for android mobile.
There are multiple types of apps available in android marketplace from
which some are paid and some are free. The amazing thing about android
is flexibility like we can eve download paid apps by using simple tricks
so if you want the check How To download paid android apps for free.
Android device comes with their own OS, Stock Rom and custom features. But people need some extra features which are not given into device. Some times the updates for older Android device is not given by your vendor. So we need the rooting process to give our phone a new look and features. In our previous article we also wrote about How To Root Android Device Easily. After rooting we have access to different subsystem of Android and we can manipulate them. We can install some advance apps which need system details which can only be access by rooting i already listed out Best Root Apps For Rooted Android Phone. But after rooting your warranty from the vendor will be void. Some time user can not control Android system correctly. So to get our warranty back we need to unroot Android device. If you do not know how to unroot Android device then don’t worry because in this article we are going to explain you easiest way to unroot Android phone back.
Android device comes with their own OS, Stock Rom and custom features. But people need some extra features which are not given into device. Some times the updates for older Android device is not given by your vendor. So we need the rooting process to give our phone a new look and features. In our previous article we also wrote about How To Root Android Device Easily. After rooting we have access to different subsystem of Android and we can manipulate them. We can install some advance apps which need system details which can only be access by rooting i already listed out Best Root Apps For Rooted Android Phone. But after rooting your warranty from the vendor will be void. Some time user can not control Android system correctly. So to get our warranty back we need to unroot Android device. If you do not know how to unroot Android device then don’t worry because in this article we are going to explain you easiest way to unroot Android phone back.
How To Unroot Android Phone. ?
Method 1st:- Unroot Android Using ES File Explorer.
 ES
File Explorer is one the best Android App which is available on Google
Play Store for free. ES file Explorer can handle the problems of Android
4.1 hang problem, video player issues, bug fixes etc. It also provide
support for Zip and rar files , provide remote file management etc.
Approximately 100,000,000 users download this App. It can also be used
to unroot Android mobile and support cloud storage support.
ES
File Explorer is one the best Android App which is available on Google
Play Store for free. ES file Explorer can handle the problems of Android
4.1 hang problem, video player issues, bug fixes etc. It also provide
support for Zip and rar files , provide remote file management etc.
Approximately 100,000,000 users download this App. It can also be used
to unroot Android mobile and support cloud storage support.Steps to Unroot Android Phone With ES File Explorer.
1. Download and Install ES file Explorer by clicking the button below.
2. Run and launch the App and tap the menu button.
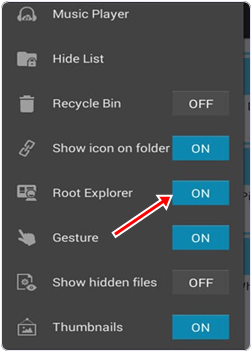
3. Now you look for Tools and then select Root Explorer.
4. Now turn on the Root Explorer.

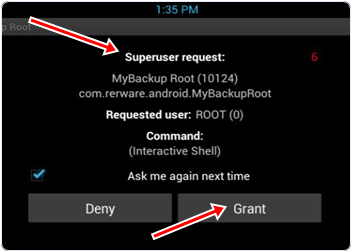
5. Now Superuser prompt you to grant Privilege or root privileges to the App. Allow it for further processing.

6. Now Return to the main screen and select ‘/‘ in the corner at top of screen.
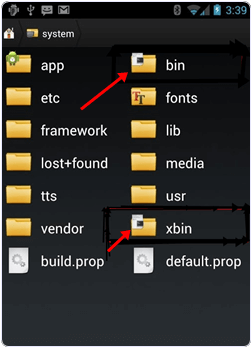
7. Now Go to system folder then Go to bin. In the bin look for the busybox and su file and delete them. If there is no any file then go to next step.
8. Return back to system folder then open xbin and delete the busybox and su file if there exist.

9. Now return to system folder and open the app and delete the superuser.apk file in the folder.
10. Restart your device after that your device will be unrooted.
3. Now you look for Tools and then select Root Explorer.
4. Now turn on the Root Explorer.

5. Now Superuser prompt you to grant Privilege or root privileges to the App. Allow it for further processing.

6. Now Return to the main screen and select ‘/‘ in the corner at top of screen.
7. Now Go to system folder then Go to bin. In the bin look for the busybox and su file and delete them. If there is no any file then go to next step.
8. Return back to system folder then open xbin and delete the busybox and su file if there exist.

9. Now return to system folder and open the app and delete the superuser.apk file in the folder.
10. Restart your device after that your device will be unrooted.
Method 2nd:- Unroot Android Phone By Using SuperSU App
Steps to Unroot Android Phone With SuperSU App.
1. Download and install SuperSU App by clicking the button below.

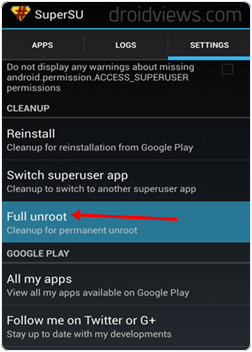
2. Click and Launch the App. Then go to settings and tap the Full Unroot.

3. It will prompt for your confirmation click on continue. After successfully unroot your App will close automatically.
4. Restart your device after unrooting.
5. Uninstall SuperSU and your device is fully unrooted now.
If you find any problem please comment below..........................


